
At Gamma Ray Digital, we receive master videotapes every day in all formats from Mini DV through HDCAM SR. What follows are best practices for tape preparation to ensure your final product comes out looking the way you expect.
The Basics
The beginning and the end of videotapes are susceptible to damage, and as such you should make sure you have at least two minutes of non-program material at the head of the tape, as well as video black at the tail. This will prevent minor physical damage to the tape from affecting the quality of your video signal.
Your master tape, no matter the format or standard, should contain the following basic layout:
- 00:57:00:00 - SMPTE Color Bars & Tone
- 00:59:00:00 - Slate
- 00:59:20:00 - Black
- 01:00:00:00 - Program
- (After Program End) - 1 Minute+ Black
Ideally, your initial timecode would begin at 00:57:00:00, and your program would begin at the One Hour mark. The three minutes in between should contain bars/tone, a slate identifying the program and black before the program start.
Bars & Tone
Bars and Tone are critical, and we cannot stress enough the importance of getting this step correct! You must use bars that are calibrated to your program's video levels. That is, don't simply insert random bars captured from another tape, since they may not match the video levels of your program. When we receive a master, we assume your bars and tone are matched to your program, and we use these as guides for calibrating our playback hardware to your tape. If your bars and tone don't match your program's levels, adjustments we make to the bars will result in incorrect color and video levels in the program.
How can you be sure the color bars are correct? It's simple - feed your color bars into a Waveform Monitor/Vecorscope and check that they're correct on the scope. Now adjust your video monitor accordingly. Play your program and verify that the black level on the scope is correct, the white levels don't exceed acceptable maximums, and that your color is correct. Also check the video on your monitor visually.
The audio tone can really be whatever level you want. Typically it's a 1kHz tone at -20db. The important thing is to make sure that you tell us what level your tone is at - preferably on the tape label or in a program information sheet included with the tape. As with color bars, we calibrate the audio levels to the reference tone, and so should you. If your reference tone is too loud, your program audio will be too quiet and vice versa.
Run your bars and tone for at least 60 seconds to give us time to make adjustments.
Program Identification
Next up should be a slate containing at least the following information, and it should be on screen for at least 10-20 seconds:
- Program Name
- Start and End Timecodes and Timecode format (Drop/Non-Drop)
- Aspect Ratio (Anamorphic? Letterboxed?)
Other helpful information:
- Start and end timecodes of additional material on the tape (trailers, for example)
- Version (if applicable)
- Creation Date
- Contact information
All of the above should also be on your tape labels, or in a program information sheet inside the videotape's plastic case.
The Program
After the slate, pad the program with black slug until you get to the 1 hour mark on your timecode. Begin your program at the 1 hour point. If you'd like to include a SMPTE countdown and 2-pop before the program, that's great - just make sure that the 2-pop comes exactly 2 seconds before the 1 hour point.
When the program has completed, please make sure there's at least 1 full minute of black at the end. Some videotape decks can "overshoot" the end timecode, and if there's no video there they can get lost in the tape. Putting a minute of black after the program end helps to avoid this situation.
Conclusion
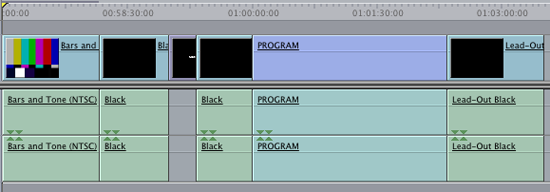
Here's a screenshot from a Final Cut Pro timeline showing the basic layout described above. An Avid timeline would look similar:
Variations to this layout are of course acceptable. The most critical aspects are that you must match your bars and tone to your actual video and audio levels, and the start of the program must be at the 1 hour timecode position. If you follow these basic guidelines, you'll make the world a brighter place. We promise!